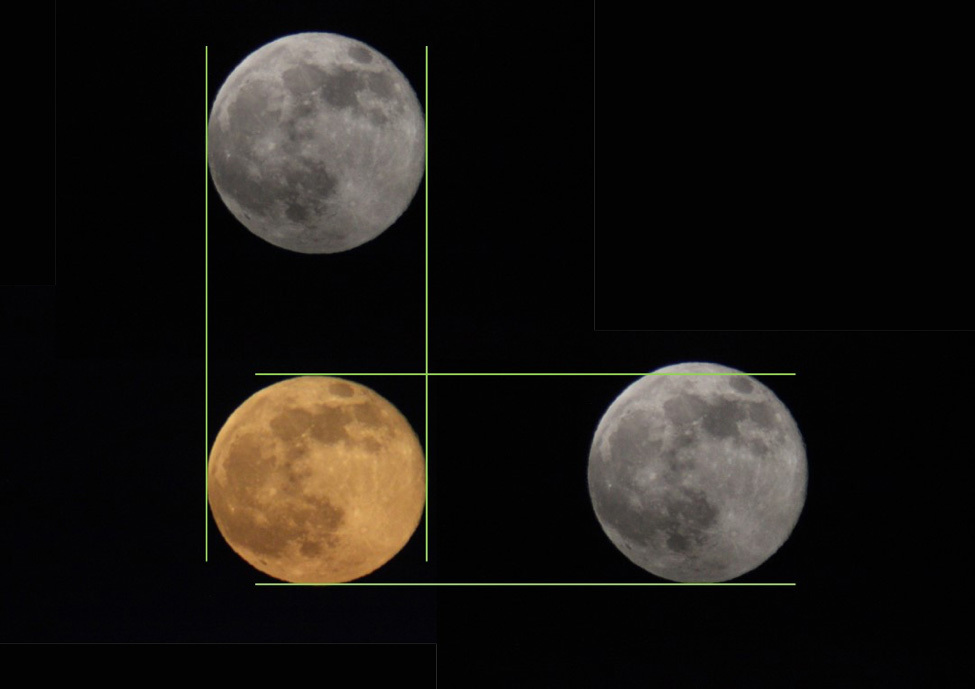
These views of the Moon were taken on June 9, 2017. The orange-colored rising moon on the lower left had just cleared low clouds on the horizon, around 8:30 p.m. PDT. The high Moon image, top left and duplicated lower right, was captured around 9:50 p.m. The full frames of the images are presented here. The green lines illustrate that the horizontal diameters of the left pair of images are the same. The vertical diameters of the bottom pair of images are different because refraction by Earth’s atmosphere “squashed” the image arriving on the camera’s sensor.
Why does a rising Moon look much bigger than the same Moon seen high in the sky during the middle of the night? Turns out, it doesn’t—and we can blame the illusion on the way our eye-brain combination behaves. Want proof that it’s just an illusion? Follow the steps below for a do-it-yourself test.
- Photograph the Moon rising, just above a distant horizon, within a couple of days around full Moon. That same night, using the same imaging system, photograph the Moon high in the sky.
- When you compare the images, the Moon will look "squashed" vertically when near the horizon and circular when high in the sky. Measure the diameter of the high moon and the longest, horizontal “diameter” of the squashed moon.
- The diameters will be the same (allowing for the small change due to Earth’s rotation carrying the camera closer to the Moon when it is high in the sky; see DIY Supermoon Imaging). This demonstrates the Moon Illusion is truly an illusion.
The squashed-looking Moon will also have a much warmer tint than the high Moon. This is due to the low Moon’s light passing through more of Earth’s atmosphere than the high Moon’s light. That squashed look is due to Earth’s atmosphere behaving like a weak lens with moonlight being bent more near the horizon than it is slightly higher above the horizon.
Any camera with a long telephoto lens can capture a pair of photos like the ones presented below. A mirrorless or DSLR (digital single lens reflex) camera can be used with a “lenses-only” telephoto. The telephoto can be combined with a teleconverter to increase the effective focal length, enlarging the image. Don’t enlarge the Moon so much that it exceeds the field of view of the sensor. Mount the camera and telephoto on a tripod, using a cable release to minimize vibration when triggering the shutter. A high ISO (sensitivity) setting allows a short shutter time to freeze any vibration due to mirror slap in the camera. Start with a shutter time equivalent of 1/ISO at f/16. It is sensible to open the lens to a lower f/# and shorten the shutter time equivalently. Bracket your shutter time for both sets of images to choose the best overall exposure for each occasion.
Saving all of your bracketed exposures will make matching the low and high Moon images easier. Earth’s atmosphere can absorb enough light at different times of night (or day) that different exposures when the Moon is low and high may give you the best image match.
To make your own comparison pictures, do not use a mirror-lens (catadioptric) telephoto or telescope or a pure reflecting telescope (except for a Newtonian telescope). The changing separation of the mirror and secondary mirror (and any correcting lenses), when focusing, changes the effective focal length of the telephoto. Temperature changes between photos also affect the separation of the mirrors and even their curvature, changing the effective focal length. A change in focal length can change the apparent sizes being recorded in the images. Temperature changes affect refracting (lens) optics much less.