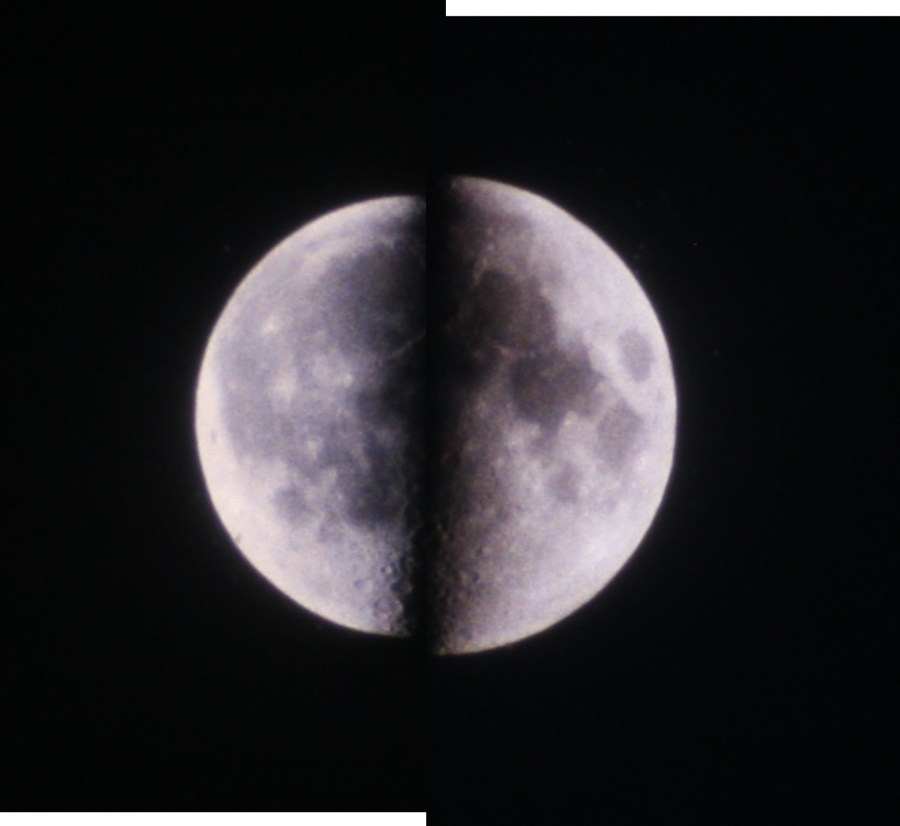
These views of the Moon were taken in August and July, 1985, the dates of Moon’s apogee and perigee, respectively. On the left the full moon was farther from Earth, on the right the Moon was closer to Earth. To bring the images together the dark halves of the individual frames were removed but their vertical centering offsets are preserved here.
The Moon’s apparent diameter, as seen from Earth, changes significantly over a “moonth”. Because of the Moon’s elliptical orbit, it is sometimes farther from Earth (farthest at apogee) and sometimes closer (closest at perigee).
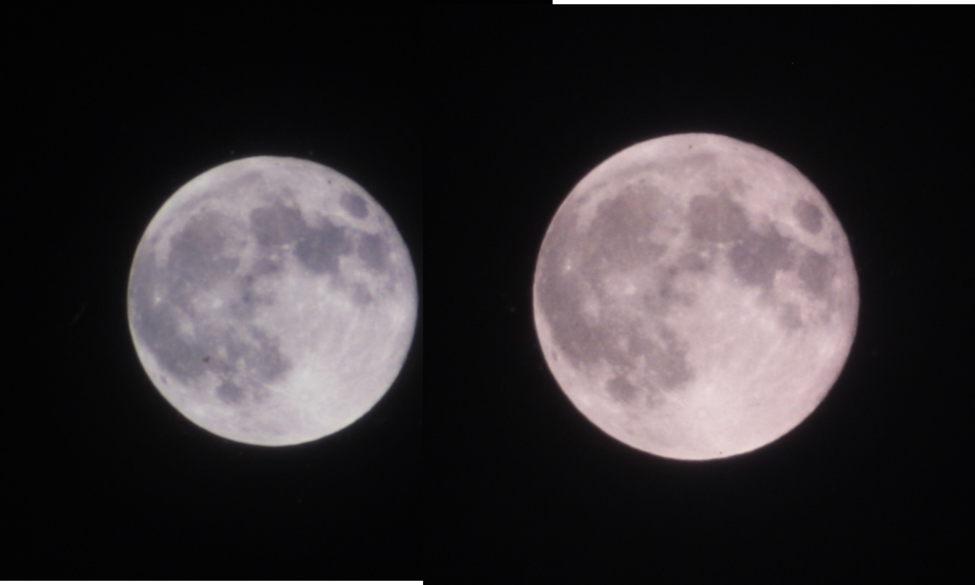
Use your favorite search engine to find the dates each month during the year to find the dates of the Moon’s phases called first quarter moon, full moon, and last quarter moon (“quarter” moons are half-illuminated). Also determine the dates of the Moon’s perigee and apogee. Decide if you want your apogee-perigee image pairs to be of full moons or opposing quarter moons (samples are below). Perigee-apogee full moons will be about 6 months apart during the year. Opposing perigee-apogee quarter moons will be separated by about 2 weeks.
Compare your list of apogee (or perigee) and find dates that match for the quarter moons and full moon. Then find the corresponding perigee (or apogee) for the comparison image set.
Take photos on the nights of apogee and perigee when the Moon is high in the sky. You can also find the dates when the first quarter (half) moon and third quarter (half) moon are at apogee and perigee (it doesn’t matter which quarter moon is at apogee and which is at perigee) and take pictures on those nights. Pairing the sets will display the obvious differences in the size of the Moon’s image due to the difference in distance from Earth.
Any camera with a long telephoto lens can capture a pair of photos like the ones presented below. A mirrorless or DSLR (digital single lens reflex) camera can be used with a “lenses-only” telephoto. Combine the telephoto with a teleconverter to increase the effective focal length, enlarging the image. Don’t enlarge the Moon so much that it exceeds the field of view of the sensor. Mount the camera+telephoto on a tripod and use a cable release to minimize vibration when triggering the shutter. A high ISO (sensitivity) setting allows a short shutter time to freeze any vibration due to mirror slap in the camera. Start with a shutter time equivalent of 1/ISO at f/16. Cameras are designed to assume everything reflects 18% of the light falling on it. That will tend to underexpose a full moon image since the Moon reflects only about 11% of the light. It is also sensible to open the lens to a lower f/# and shorten the shutter time equivalently. Bracket your shutter time to choose the best overall exposure.
Save all of your bracketed exposures to make matching the apogee and perigee images easier. Earth’s atmosphere can absorb enough light at different times of night (or day) that different exposures at perigee and apogee may give you the best image match.
To make your own comparison pictures, do not use a mirror-lens (catadioptric) telephoto or telescope or a pure reflecting telescope (except for a Newtonian telescope). The changing separation of the mirror and secondary mirror (and any correcting lenses), when focusing, changes the effective focal length of the telephoto. Temperature changes between photos also affect the separation of the mirrors and even their curvature, changing the effective focal length. The change in focal length mimics the changing apparent sizes being recorded in the images. Temperature changes affect refracting (lens) optics much less.